Document Actions
Receiving A Proposal - Step By Step
-
Obtain Tango Attachment. When you receive an e-mail from your Network Sales Rep, it will have the Tango file attached, together with the usual PDF (or Excel worksheet, etc) providing the proposal. Save the Tango attachment to disk somewhere handy - it will have a '.tango' extension.
-
Start Tango Toolbar. Look for the Tango shortcut on your desktop or Citrix platform. Look at the graphic in the top left of this page - the yellow swirly thing - the Tango shortcut icon looks similar. When you find it, double click the shortcut to start Tango. This will open a simple four button toolbar.
-
Start the "Receive Proposals" application. Click on the left most button in the toolbar - the one with the tooltip "Receive Proposals" and a window will appear.
-
Open The Attachment. Press the "Load proposal" button and open the file created in step 1. As an alternative, at some sites, you can drag the file created in step 1 from Windows Explorer and drop it on the Tango window.
-
Filter Tango. You can filter what is displayed (and later exported) by clicking the "Filter" button. The filter will allow you to display a subset of the spots by selecting only the weeks, markets and spot durations you wish to have displayed. You can also remove rating data you do not wish to export by deselecting some or all demographics.
-
Inspect The Summary Page. You'll find it on the far right of the market tabs in the Tango Window. It tells you what demos are involved and the proposal's date range.
-
Create a Schedule in BCC Media Desktop. In step 9, you'll be importing this proposal into this schedule, so ensure you create it for the right Client and Product and, most importantly, for the right date range and demographics (obtained in step 6).
-
Export From Tango.
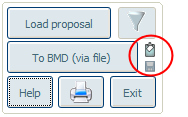 Normally, you would export from Tango to BMD via
clipboard, but in some environments or for large proposals this might be difficult. An alternative is to export to
BMD via file. You can switch between the two modes by pressing the small icons next to the "To BMD" button.
The affect of pressing each will be obvious from the way the button name changes.
Normally, you would export from Tango to BMD via
clipboard, but in some environments or for large proposals this might be difficult. An alternative is to export to
BMD via file. You can switch between the two modes by pressing the small icons next to the "To BMD" button.
The affect of pressing each will be obvious from the way the button name changes.
To do the export, press the "To BMD" button. This places the proposal into the clipboard (or to the nominated file) in a way that BCC Media Desktop can import (in the next step). Note that if you have used the filter, then Tango will export what has been filtered not the originally loaded data. -
Import Into BCC Media Desktop. Back in the BCC Media Desktop schedule you created in step 7, select the "Import From MediaWise" menu item. In the dialog box that appears, choose to import from the clipboard or file depending upon your choice in step 8. Also ensure the rates, ratings and programs check boxes are ticked.
If, on import, BCC Media Desktop produces errors like this "Market Conversion Missing" or this "Medium Conversion Missing" then your BCC Media Desktop administrator needs to do this to fix it.
-
Check Carefully. Tango is new software, so you should carefully check that the spots in BCC match those in the PDF supplied by the Network. If you find any issues please contact us.
Did You Know?
- You can use the Filter Tool
 to limit the data you load into BMD.
 - Top & Tail spots can be split into individual spots. If the network data contains enough information you will be asked to do this, but if not you can still do it manually. Refer "Splitting Top & Tail spots" or watch the video tutorial (8 minutes) for more information.
- You can load other file types. By default Tango expects proposals in its own format, but it can also load other file types such as MWI and PRP. Refer "Loading Other File Types" for more information.
-